Uneven Tamping Versus Grinder Clumps: How to Tell the Difference
Uneven tamping and grinder clumps can both cause channeling, but they leave different clues in the portafilter. Here is how to separate the two problems and fix the more likely cause first.
Uneven tamping and grinder clumps can both produce fast, weak, or inconsistent espresso shots, but they are not the same problem. Uneven tamping leaves the puck sloped or compressed more on one side. Grinder clumps create dense pockets of grounds that water may bypass, even when the final tamp looks level.
The quickest approach is to inspect the grounds before tamping, then check whether the puck is level and evenly distributed after preparation. Fix distribution before buying a new grinder; replace or upgrade the grinder only when clumping remains severe after basic cleaning and setup checks.
How the two problems differ
Clue
Uneven tamping
Grinder clumps
What you see before tamping
Grounds may already look fairly even
Visible lumps, strands, or compacted pockets
What you see after tamping
Puck may be tilted or higher on one side
Puck can look level but contain dense areas
Typical shot behavior
Flow favors one side or starts unevenly
Shot may channel unpredictably from one shot to the next
Main correction
Improve distribution and keep the tamper level
Break up clumps and address grinder retention, static, or adjustment
Likely purchase, if needed
Distribution tool or dosing funnel
Better-maintained or better-designed grinder, depending on the cause
Neither symptom proves the cause by itself. Espresso is affected by grind size, dose, freshness, basket shape, tamping, and brewing temperature, so change one variable at a time.
Signs the tamp is uneven
Uneven tamping is more likely when:
The dry coffee bed is visibly higher on one side before tamping.
The tamper enters at an angle or does not fit the basket well.
The puck is visibly sloped after tamping.
The espresso stream favors one side of the basket.
The problem improves when you carefully level the grounds before tamping.
Tamp pressure does not need to be extreme. A level, repeatable tamp is usually more useful than pressing as hard as possible. Keep your wrist straight, let the tamper sit flat in the basket, and avoid twisting aggressively at the end if it disturbs the puck.
How to correct uneven tamping
Dose into the center of the basket or use a dosing funnel to reduce spills.
Gently distribute the grounds so there are no obvious high or low areas.
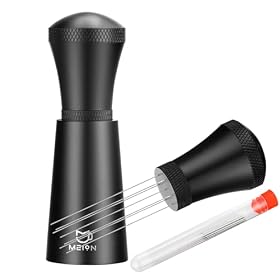
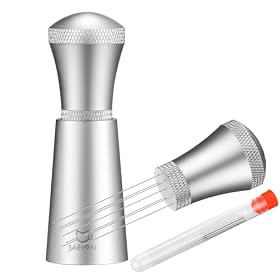
If you use a distribution needle tool, make shallow, consistent passes rather than stirring only the surface.
Place the tamper straight down and check that its base is level with the basket.
Use the same dose and tamping routine for several shots before changing the grind.
A tamper that is too small can leave a ring of loose coffee around the basket edge. A tamper that is too large may bind against the basket walls. The tamper size should match the basket's actual inside diameter, not just the nominal portafilter size.
Product prices and availability are accurate as of the date/time indicated and are subject to change. Any price and availability information displayed on Amazon.com at the time of purchase will apply to the purchase of this product.
Signs the grinder is creating problematic clumps
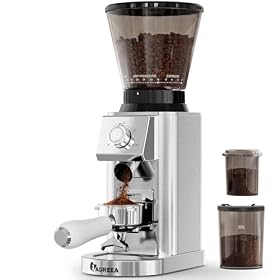
Grinder clumps are more likely when the grounds come out in compact lumps or narrow streams instead of a reasonably loose pile. Other clues include:
Clumps remain even after the grinder is cleaned.
The grinder retains old grounds that come out with the next dose.
Static makes grounds cling to the chute, cup, or portafilter.
The same grind setting produces noticeably different textures from one dose to the next.
Breaking apart the clumps and redistributing the coffee produces a more consistent shot.
Some clumping is normal, particularly with certain burr designs, darker roasts, low-humidity conditions, or coffee that has developed static. Clumps become a practical problem when they create dense pockets that your normal distribution routine does not reliably break up.
Product prices and availability are accurate as of the date/time indicated and are subject to change. Any price and availability information displayed on Amazon.com at the time of purchase will apply to the purchase of this product.
What to check before replacing the grinder
Clean the burrs and exit path
Unplug the grinder before cleaning it, and follow the manufacturer’s instructions. Remove retained coffee from the accessible burr area, chute, and dosing path. Old grounds can combine with fresh coffee and produce inconsistent dosing or compacted material.
Do not wash burrs or electrical components unless the manufacturer specifically allows it. Reassemble the grinder correctly and confirm that the grind setting has not shifted.
Check retention and dosing consistency
If the grinder holds a noticeable amount of coffee in its chute or chamber, the first dose after a period of inactivity may not match the next dose. Weighing the input and output with a small scale can reveal whether the grinder is delivering the intended dose consistently.
Retention alone does not always mean the grinder is defective. The important question is whether it causes a meaningful dose or grind-size change between shots.
Consider roast, freshness, and static
Very dark, oily, or especially fresh coffee can behave differently from a lighter or more settled roast. Static also varies with room humidity and grinder design. Keep the beans dry, avoid adding liquid to the grinder unless its manufacturer explicitly permits a particular method, and do not assume every visible clump requires replacement.
Break up the clumps before tamping
A narrow distribution needle tool can break apart compacted grounds and spread them through the basket. Use it consistently and avoid digging so deeply or aggressively that you create large voids near the bottom of the puck. The goal is even density, not simply a flat-looking surface.
Product prices and availability are accurate as of the date/time indicated and are subject to change. Any price and availability information displayed on Amazon.com at the time of purchase will apply to the purchase of this product.
A simple diagnosis sequence
Use the same coffee, basket, dose, and approximate grind setting while checking the following:
Inspect the grinder output. Are there obvious clumps or retained grounds?
Inspect the dry coffee bed. Is it piled to one side or concentrated around the edges?
Distribute consistently. Break apart visible clumps and level the bed.
Tamp straight down. Confirm that the tamper is not tilted or binding.
Compare several shots. One poor shot is not enough to identify the cause.
Check the spent puck carefully. A damaged or eroded area can support the diagnosis, but puck appearance alone is not definitive.
If careful distribution makes the shots more repeatable, clumps or uneven distribution were likely contributing. If the puck remains visibly tilted, focus on tamping technique, basket fit, and how the dose enters the portafilter.
When an accessory is enough
A dosing funnel can make it easier to keep grounds in the basket. A distribution tool can help break up clumps and reduce dense pockets. These accessories are useful when the grinder doses reasonably consistently but the coffee arrives in a compact or uneven pile.
They will not correct a grinder that has severe retention, damaged burrs, unstable adjustment, or an inconsistent motor. They also cannot compensate for a wrong grind setting or stale coffee.
When a grinder upgrade makes sense
Consider replacing or upgrading the grinder when:
Cleaning does not improve severe clumping or retention.
Dose output varies substantially despite a consistent input.
The grind adjustment shifts during use.
The burrs or carrier appear damaged or improperly seated.
The grinder cannot produce a reasonably consistent espresso grind for your coffee.
Check the manufacturer’s service guidance before opening the grinder beyond user-serviceable areas. Burr alignment, electrical faults, and motor problems are better handled by qualified service personnel when they are not covered by the normal cleaning procedure.
Bottom line
Uneven tamping is primarily a puck-preparation problem; grinder clumps are primarily a grind-delivery problem. Inspect the grounds first, break up clumps, distribute evenly, and tamp level before changing equipment. If the same routine still produces severe clumping or inconsistent dosing after cleaning, the grinder—not the tamp—is the more reasonable upgrade target.
Yes. Dense clumps can make the coffee bed uneven or cause the tamper to compress some areas more than others. Break up and distribute the clumps before tamping to determine whether they are contributing.
Is a harder tamp better for grinder clumps?
No. More pressure does not reliably remove dense pockets in the grounds. Consistent distribution and a level tamp are more important than tamping as hard as possible.
Should I use a WDT tool for every shot?
A distribution needle tool can be useful when your grinder produces visible clumps or a narrow, compact stream. Use the same shallow, consistent technique each time so it improves repeatability rather than adding another variable.
How do I know whether to replace my grinder?
Clean the grinder, check retention and dose consistency, and compare shots after consistent distribution. Replacement becomes more reasonable when severe clumping, unstable adjustment, damaged burrs, or inconsistent dosing persists.